Showing posts with label Blogger widget. Show all posts

Useful Tools for Bloggers


Useful Tools for BloggersWhen we repair or customize something there is always a handy tool that will make our work easier.

So, here at bloggerpreneur we would like to be that tool to help you optimize your website easier. Besides from the tips and tricks we offer, I will share some tools that I personally use to optimize my blog site.

Check them out! its free and easy to use.

HTML Parser

HTML Parser is a Java library used to parse HTML in either a linear or nested fashion. Primarily used for transformation or extraction, it features filters, visitors, custom tags and easy to use JavaBeans. It is a fast, robust and well tested package.

Check our HTML parser Tool

Hex Color Scheme Generator and CSS Color Chart

This tool is useful for creating your own color scheme. An example is #FFFFFF which is white and #000000 is black 

Use the tool HERE

CSS Optimizer

Optimization is very important to any website, mainly because search engines like Google loves highly optimized fast loading sites. So, we have here a tool that can compress CSS for your Blog.

Use the tool HERE

Page Rank Checker

Checking your websites pagerank is very important because it determines how important your website is. Another advantage of websites having high page rank is the opportunity to make money from advertisers. Usually merchants and business owner advertises on high ranking sites, so you should check your page rank occasionally.

Use the tool HERE

Character Counter Tool

When you are going to write an article or meta description, you should make it sure it's within the required limit so you could attract more traffic to your site. By using this simple tool you can count how many character you made so far.

Use the tool HERE


If you liked it, kindly share to others so that we can help more.

Cheers!

How to add Floating Ads widget for blogger/blogspot

Banner advertisement is one of the main ways on how a blogger makes money. Carefully putting ads where visitors can easily see them gives a higher chance of being clicked.

There are lot of techniques on how to strategically put banners, just like putting them on the header, sidebar and below post titles.

And now I will show you a different technique, its about how to add floating banners so that you can put ads in it. Installation of this trick is very easy just like my past tips on blogger widget.

By adding this widget and carefully blending it beautifully with your template, you can increase revenue for your blog.   

DEMO


Features

  • Very easy to install and uninstall 
  • Attractive look that makes visitors click on the ads.
  • Has a close button
  • Gives chance to increase ads earnings.
  • Readers can easily see your ads.

Add this widget


1. Go to your blogger account

2. Click layout > Add gadget > HTML/Javascript.

3. Add the codes below

 <style>
#btftopbar {
height:30px;
width:auto;
background: #005094 url('..');
background-repeat:repeat-x;
text-align:left;
padding-top:4px;
}
#adsground {
height:600;
margin:0 auto;
width: 160px;
background:#fff;
border-bottom:2px #005094 solid;
border-right:2px #005094 solid;
border-left:2px #005094 solid;
text-align:center;
padding:4px;
}

#headlineatas {
opacity:1.0;
height:auto;
width:auto;
position:fixed;
top:65px;
left:10px;
border-bottom:1px #005094 solid;
border-bottom:0px blue solid;
color:#333;
padding:0px;
z-index:1001;
font-size:13px;}
</style>
<script type="text/javascript">
function getValue()
{
document.getElementById("headlineatas").style.display = 'none';
}
</script>
<div id="headlineatas">
<div id="btftopbar">

<span style="color:#fff;font-size:13px;font-weight:bold;text-shadow:black 0.1em 0.1em 0.1em"></span>
<span style="color:#fff;font-size:13px;font-weight:bold;text-shadow:black 0.1em 0.1em 0.1em;float:right;padding-top:3px;padding-right:10px"><a href="http://www.fromhobby2money.blogspot.com/
2013/03/how-to-add-floating-ads-widget-for.html" target="_blank" onclick="getValue()">close(x)</a></span>
</div>
<div id="adsground">
<h3></h3>
<p align="left"><h3></h3></p>
<p>

Ads code here

<br/></p></div></div>

 Customize

  • Replace "Ads code here" with your adsense script code.
  • You can change the width by replacing its value160px.
  • If you want to float it on the right side, change "left" to "right".
  • After doing some customization, hit save and check out your new floating Ads.


Do you liked it? Kindly subscribe or share our work.

Cheers! 
 

Horizontal Random Post Widget for Blogger

Do you want to have a random post that looks like a featured post slider? If yes, then you should check this widget out.

It appears just like the image shown below


Horizontal Random Post Widget for Blogger

Features for this widget
  • Easy to install. 
  • Horizontal appearance that looks like a feature post slider
  • Easy to customize
  • Thumbnail ready
  • Doesn't affect loading speed

Install this widget

1. Go to blogger.com account
2. Dashboard then click "layout"
3. Add gadget and select "HTML/Javascript" then copy and paste the following code below
<b:if cond='data:blog.pageType == &quot;item&quot;'> <style type="text/css"> #random-posts li{width:125px;height:150px;margin-right:12px;float:left;list-style:none;position:relative} #random-posts li:last-child{margin-right:0} #random-posts li img{width:125px;height:150px} #random-posts li img a{border:#333 solid 2px}; #random-posts li .isinyako{position:absolute;width:250px;top:-150px;z-index:2;background-color:#F0F0F0;padding:5px;font-size:90%;border-bottom:2px solid black;transition:all 0.6s cubic-bezier(1,2,0,0) 0s;-moz-transition:all 0.6s cubic-bezier(1,2,0,0) 0s;-webkit-transition:all 0.6s cubic-bezier(1,2,0,0) 0s;-o-transition:all 0.6s cubic-bezier(1,2,0,0) 0s;visibility:hidden;opacity:0} #random-posts li:last-child .isinyako{right:0} #random-posts li:hover .isinyako{top:-40px;opacity:1;visibility:visible} .isinyako span{font-size:90%;color:#B30B0B} .isinyako p{font-size:90%;} </style> <span class="glap"> <ul id="random-posts"> <script type="text/javaScript"> var rdp_numposts = 5; var rdp_snippet_length = 150; var rdp_info = 'no'; var rdp_comment = 'Comments'; var rdp_disable = 'Turn off comments'; var rdp_current = []; var rdp_total_posts = 0; var rdp_current = new Array(rdp_numposts); function totalposts(a){rdp_total_posts=a.feed.openSearch$totalResults.$t}document.write('<script type="text/javascript" src="/feeds/posts/default?alt=json-in-script&max-results=0&callback=totalposts"><\/script>');function getvalue(){for(var b=0;b<rdp_numposts;b++){var d=false;var c=get_random();for(var a=0;a<rdp_current.length;a++){if(rdp_current[a]==c){d=true;break}}if(d){b--}else{rdp_current[b]=c}}}function get_random(){var a=1+Math.round(Math.random()*(rdp_total_posts-1));return a}; </script> <script type="text/javaScript"> function random_posts(n){a=location.href;y=a.indexOf("?m=0");for(var f=0;f<rdp_numposts;f++){var l=n.feed.entry[f];var m=l.title.$t;if("content" in l){var o=l.content.$t}else{if("summary" in l){var o=l.summary.$t}else{var o=""}}o=o.replace(/<[^>]*>/g,"");if(o.length<rdp_snippet_length){var k=o}else{o=o.substring(0,rdp_snippet_length);var b=o.lastIndexOf(" ");k=o.substring(0,b)+"&#133;"}for(var e=0;e<l.link.length;e++){if("thr$total" in l){var h=l.thr$total.$t+" "+rdp_comment}else{h=rdp_disable}if(l.link[e].rel=="alternate"){var d=l.link[e].href;if(y!=-1){d=d+"?m=0"}var g=l.published.$t;if("media$thumbnail" in l){var c=l.media$thumbnail.url}else{c="https://blogger.googleusercontent.com/img/b/R29vZ2xl/AVvXsEjo1b3hMDRbF1PeHebOuPfMMi4u2Ngf9hJ1SsiV2OZUtvDHUmDG_-F9NoUYcMdYrQMir4jCyzSH1MbW7yNsKE9QVF4fXfC1BRL0tzfIZMzhK5hOZ2J1X-498Sz-tBfst9v8ZrK3su371Ew/s1600/no_image.jpg"}}}document.write("<li>");document.write('<a href="'+d+'" rel="nofollow"><img alt="'+m+'" src="'+c+'"/></a>');document.write('<div class="isinyako"><h5>'+m+"</h5>");if(rdp_info=="yes"){document.write("<span>"+g.substring(8,10)+"/"+g.substring(5,7)+"/"+g.substring(0,4)+" - "+h+"</span>")}document.write("<p>"+k+"</p></div>");document.write('<div style="clear:both"></div></li>')}}getvalue();for(var i=0;i<rdp_numposts;i++){document.write('<script type="text/javascript" src="/feeds/posts/default?alt=json-in-script&start-index='+rdp_current[i]+'&max-results=1&callback=random_posts"><\/script>')}; </script> </ul></span> <script type='text/javascript'> //<![CDATA[ function resizeThumb(e,b){var c=document.getElementById(e),d=c.getElementsByTagName("img");for(var a=0;a<d.length;a++){d[a].src=d[a].src.replace(/\/s72\-c/,"/s"+b+"-c");d[a].width=b;d[a].height=b}}resizeThumb("random-posts",120); //]]></script> </b:if>

4. After copying and pasting the code, put it below header or just above the footer just like shown on the image.

Customize

  • If you want to change the width and height just change this width:125px;height:150px.
  • To change the number of posts just replace this number 5;
  • To change the snippet just replace the value 150;

Troubleshooting

At first I have some trouble using this widget when I put it below header or just above the footer. The snippet is messing with the widget near it and it looks ugly. I tried reducing the snippet value to zero, it helps, but there are still some letters left.

My solution was putting a gap using an image that will blend between this widget and the widget above or below it. In my case, my template is white, so I downloaded a 728x90 pure white image and place it in between. Now it doesn't mess with the design.


[code source: www.growtechinfo.com]

Do you liked it? Got questions? Let me read your thought

New social subscribe widget for blogger


New social subscribe widget for bloggerKumusta! Today I am going to share a cool new social subscribe widget for blogger. This social sharing tool includes Facebook, Twitter, RSS, and Google plus. The icons look like drawn from crayons which is cool, above it is a mail box! It is simple and attractive, I am sure with this widget you will get more subscribers.

A demo of this tool can be seen on this very blog, I have replaced my old social subscribe widget because it is already been used by many bloggers.

Installation

As always installing blogger widgets here at FH2M is very easy. All you need to do is go to your blogger layout and click > add gadget > choose HTML/Javascript and add the codes below.

<a href="http://feeds.feedburner.com/FromHobby2money" imageanchor="1" style="margin-left: .5em; margin-right: 1em; float: center;" rel="nofollow" target="blank"><img border="0" height="40" src="http://www.sassyandgeorge.com/wp-content/uploads/2011/01/subscribe2-copy.jpg" width="290" /></a>
<style>
.mbtips-email{
background:Fff no-repeat 0px 12px ;
width:250px;
float:center;
font-size:1.4em;
font-weight:bold;
margin:2px 20px 0px 35px;
color:#686B6C;
}
.mbtips-emailsubmit{
background:#0084CE;
cursor:pointer;
color:#fff;
border:none;
padding:3px;
margin:0 0 0px 0;
text-shadow:0 -1px 1px rgbaundefined0,0,0,0.25);
-moz-border-radius:2px;
-webkit-border-radius:2px;
border-radius:2px;
font:12px sans-serif;
}
.mbtips-emailsubmit:hover{
background:#E98313;
}
.textarea{
padding:2px;
margin:0px 2px 0px 2px;
background:#f9f9f9;
border:1px solid #ccc;
resize:none;
box-shadow:inset 1px 1px 1px rgbaundefined0,0,0,0.1);
-moz-box-shadow:inset 1px 1px 1px rgbaundefined0,0,0,0.1);
-webkit-box-shadow:inset 1px 1px 1px rgbaundefined0,0,0,0.1); font-size:13px;
width:170px;
color:#666;}
</style>
<style class="text/css">
.center
{
text-align:center;
font-weight:bold;
margin:10px;
}
</style>
<div class="center">
Submit your Email Address to Get Free Blogger Tips Directly to your Inbox
</div>
<div class="mbtips-email">
<form action="http://feedburner.google.com/fb/a/mailverify" id="feedform" method="post" target="popupwindow" onsubmit="window.openundefined'http://feedburner.google.com/fb/a/mailverify?uri=FromHobby2money', 'popupwindow', 'scrollbars=yes,width=550,height=520');return true">
<input gtbfieldid="3" class="textarea" name="email" onblur="if undefinedthis.value == &quot;&quot;) {this.value = &quot;Enter email address here&quot;;}" onfocus="if undefinedthis.value == &quot;Enter email address here&quot;) {this.value = &quot;&quot;;}" value="Enter email address here..." type="text" />
<input type="hidden" value="FromHobby2money" name="uri"/><input type="hidden" name="loc" value="en_US"/>
<input class="mbtips-emailsubmit" value="Submit" type="submit" />
</form>
</div>
<style class="text/css">
table
{
border-bottom: 0px solid #E6E6E6;
float: center;
width: 240px;
margin:10px 0 0 15px;
}
.subicons
{
border-right: 1px solid #E6E6E6;
}
.Fadeout {
filter:alphaundefinedopacity=100);
opacity: 1.0;
border:0;
}
.Fadeout:hover{
filter:alphaundefinedopacity=80);
opacity: 0.8;
border:0;
}
</style>
<div class="table">
<table>
<tr>
<td><div class="subicons"><a class="Fadeout" href="http://www.facebook.com/pages/FromHobby2Money" imageanchor="1" target="_blank" rel="nofollow"><img border="0" src="https://blogger.googleusercontent.com/img/b/R29vZ2xl/AVvXsEiLsFi2RLW6S_pvilITnesDpqFHwi-Gf7whXLsxthktOQgQE2V4o6P-i9i2tX9YiGdOliQPF8kv1Tqbc9omFB4wS7QIvoVvVuahrfl-pB_71z73tAibhBDWkxVmqG-BzhVUlF30TW-70V2Q/s1600/facebook-48.png" /></a></div></td><td><div class="subicons"><a class="Fadeout" href="http://twitter.com/dadhust" imageanchor="1" target="_blank" rel="nofollow"><img border="0" src="https://blogger.googleusercontent.com/img/b/R29vZ2xl/AVvXsEgipzpNXXe94nLXtZiMdO3XLT-7sDMNrPr5Ut5SPHOVxlcQaJWjb_VoDZGctLsEjbgFE86sqfIaJmUBoII7JvCLSzxlgO_OA7sYTNtnSLrRguKsmNYWFb10sbV7zUvP4eQQMdFJFNUkrezd/s1600/twitter-48.png" /></a></div></td>
<td><div class="subicons"><a class="Fadeout" href="http://feeds.feedburner.com/FromHobby2money" imageanchor="1" target="_blank" rel="nofollow"><img border="0" src="https://blogger.googleusercontent.com/img/b/R29vZ2xl/AVvXsEidVQL-GKaM6V0eYDYlKIikOj7NynBffAyOss8yr5_w5ZJH95UxeRVfv9PB6VDcG7gg0aCEsbgK1LSkXqM28eK6IBQV7qShaG5eYN3pPwBUI4tNXP0X6ZOLzi8yXYfkc3ZjxCg8ulnPPrut/s1600/rss-48.png" /></a></div></td>
<td><a class="Fadeout" href="https://plus.google.com/118431186284938329492/posts" imageanchor="1" target="_blank" rel="nofollow"><img border="0" src="https://blogger.googleusercontent.com/img/b/R29vZ2xl/AVvXsEh0H-FEMn6txmTQCWJeseX6dmCmDdWqBXk6UTO0bOMjAI7X68g3vTm3rPat8KzW_XVBOnBEV3K1eMOLvSqi3f0Ipad3Q-2Bn_K9-wXGoq46D2_Reqtm-yA8-7OgjRnAusLXk14Jg7IxolzA/s1600/google-48.png" /></a></td>
</tr></table> 
</div> 

Customize

  • Replace FromHobby2money with your own feedburner username they appear 4 times on this widget.
  • Replace FromHobby2Money with your facebook fan page username.
  • Replace dadhust with your Twitter username.
  • Replace 118431186284938329492 with your Google plus profile ID.
  • If you want to change the width of the widget, you can edit this to fit perfectly on your blogger sidebar. Change this 240px.

TechCrunch like social subscribe widget


New social subscribe widget for bloggerKumusta! Today I am going to share a cool new social subscribe widget for blogger. This social sharing tool includes Facebook, Twitter, RSS, and Google plus. The icons look like drawn from crayons which is cool, above it is a mail box! It is simple and attractive, I am sure with this widget you will get more subscribers.

A demo of this tool can be seen on this very blog, I have replaced my old social subscribe widget because it is already been used by many bloggers.

Installation

As always installing blogger widgets here at FH2M is very easy. All you need to do is go to your blogger layout and click > add gadget > choose HTML/Javascript and add the codes below.

<a href="http://feeds.feedburner.com/FromHobby2money" imageanchor="1" style="margin-left: .5em; margin-right: 1em; float: center;" rel="nofollow" target="blank"><img border="0" height="40" src="http://www.sassyandgeorge.com/wp-content/uploads/2011/01/subscribe2-copy.jpg" width="290" /></a>
<style>
.mbtips-email{
background:Fff no-repeat 0px 12px ;
width:250px;
float:center;
font-size:1.4em;
font-weight:bold;
margin:2px 20px 0px 35px;
color:#686B6C;
}
.mbtips-emailsubmit{
background:#0084CE;
cursor:pointer;
color:#fff;
border:none;
padding:3px;
margin:0 0 0px 0;
text-shadow:0 -1px 1px rgbaundefined0,0,0,0.25);
-moz-border-radius:2px;
-webkit-border-radius:2px;
border-radius:2px;
font:12px sans-serif;
}
.mbtips-emailsubmit:hover{
background:#E98313;
}
.textarea{
padding:2px;
margin:0px 2px 0px 2px;
background:#f9f9f9;
border:1px solid #ccc;
resize:none;
box-shadow:inset 1px 1px 1px rgbaundefined0,0,0,0.1);
-moz-box-shadow:inset 1px 1px 1px rgbaundefined0,0,0,0.1);
-webkit-box-shadow:inset 1px 1px 1px rgbaundefined0,0,0,0.1); font-size:13px;
width:170px;
color:#666;}
</style>
<style class="text/css">
.center
{
text-align:center;
font-weight:bold;
margin:10px;
}
</style>
<div class="center">
Submit your Email Address to Get Free Blogger Tips Directly to your Inbox
</div>
<div class="mbtips-email">
<form action="http://feedburner.google.com/fb/a/mailverify" id="feedform" method="post" target="popupwindow" onsubmit="window.openundefined'http://feedburner.google.com/fb/a/mailverify?uri=FromHobby2money', 'popupwindow', 'scrollbars=yes,width=550,height=520');return true">
<input gtbfieldid="3" class="textarea" name="email" onblur="if undefinedthis.value == &quot;&quot;) {this.value = &quot;Enter email address here&quot;;}" onfocus="if undefinedthis.value == &quot;Enter email address here&quot;) {this.value = &quot;&quot;;}" value="Enter email address here..." type="text" />
<input type="hidden" value="FromHobby2money" name="uri"/><input type="hidden" name="loc" value="en_US"/>
<input class="mbtips-emailsubmit" value="Submit" type="submit" />
</form>
</div>
<style class="text/css">
table
{
border-bottom: 0px solid #E6E6E6;
float: center;
width: 240px;
margin:10px 0 0 15px;
}
.subicons
{
border-right: 1px solid #E6E6E6;
}
.Fadeout {
filter:alphaundefinedopacity=100);
opacity: 1.0;
border:0;
}
.Fadeout:hover{
filter:alphaundefinedopacity=80);
opacity: 0.8;
border:0;
}
</style>
<div class="table">
<table>
<tr>
<td><div class="subicons"><a class="Fadeout" href="http://www.facebook.com/pages/FromHobby2Money" imageanchor="1" target="_blank" rel="nofollow"><img border="0" src="https://blogger.googleusercontent.com/img/b/R29vZ2xl/AVvXsEiLsFi2RLW6S_pvilITnesDpqFHwi-Gf7whXLsxthktOQgQE2V4o6P-i9i2tX9YiGdOliQPF8kv1Tqbc9omFB4wS7QIvoVvVuahrfl-pB_71z73tAibhBDWkxVmqG-BzhVUlF30TW-70V2Q/s1600/facebook-48.png" /></a></div></td><td><div class="subicons"><a class="Fadeout" href="http://twitter.com/dadhust" imageanchor="1" target="_blank" rel="nofollow"><img border="0" src="https://blogger.googleusercontent.com/img/b/R29vZ2xl/AVvXsEgipzpNXXe94nLXtZiMdO3XLT-7sDMNrPr5Ut5SPHOVxlcQaJWjb_VoDZGctLsEjbgFE86sqfIaJmUBoII7JvCLSzxlgO_OA7sYTNtnSLrRguKsmNYWFb10sbV7zUvP4eQQMdFJFNUkrezd/s1600/twitter-48.png" /></a></div></td>
<td><div class="subicons"><a class="Fadeout" href="http://feeds.feedburner.com/FromHobby2money" imageanchor="1" target="_blank" rel="nofollow"><img border="0" src="https://blogger.googleusercontent.com/img/b/R29vZ2xl/AVvXsEidVQL-GKaM6V0eYDYlKIikOj7NynBffAyOss8yr5_w5ZJH95UxeRVfv9PB6VDcG7gg0aCEsbgK1LSkXqM28eK6IBQV7qShaG5eYN3pPwBUI4tNXP0X6ZOLzi8yXYfkc3ZjxCg8ulnPPrut/s1600/rss-48.png" /></a></div></td>
<td><a class="Fadeout" href="https://plus.google.com/118431186284938329492/posts" imageanchor="1" target="_blank" rel="nofollow"><img border="0" src="https://blogger.googleusercontent.com/img/b/R29vZ2xl/AVvXsEh0H-FEMn6txmTQCWJeseX6dmCmDdWqBXk6UTO0bOMjAI7X68g3vTm3rPat8KzW_XVBOnBEV3K1eMOLvSqi3f0Ipad3Q-2Bn_K9-wXGoq46D2_Reqtm-yA8-7OgjRnAusLXk14Jg7IxolzA/s1600/google-48.png" /></a></td>
</tr></table>
 </div>

Customize

  • Replace FromHobby2money with your own feedburner username they appear 4 times on this widget.
  • Replace FromHobby2Money with your facebook fan page username.
  • Replace dadhust with your Twitter username.
  • Replace 118431186284938329492 with your Google plus profile ID.
  • If you want to change the width of the widget, you can edit this to fit perfectly on your blogger sidebar. Change this 240px.

Easy to install floating sticky bar with social sharing buttons


sticky bar for blogger
Good day my friendships! in today's episode of FH2M I am going to share a blogger widget that will help you navigate your site easier. It is a floating sticky bar with social sharing buttons for facebook, twitter and Google+, I also call this the floating menu bar.

After searching for a cool sticky bar I finally choose this one. I like it because it is very easy to install and you can edit its colors, font style, font size, you can also choose where you want to put it, top or bottom. A demo of this widget can be seen on this blog, I am using it as my menu bar and blend it to my template to make it look cool.

You can also add more features to this sticky bar if you are good with coding. So lets start shall we.

Installation

1. Go to your blogger.com account

2. Go to edit HTML and make sure you backed up your template in case something goes wrong.

3. Go to your blogger layout > Add gadget > HTML/ Javascript and add the codes below and save

<style type='text/css'>
#tnsbar {
background: none repeat scroll 0 0 #000000;
border-bottom: 2px solid #F3F3F3;
box-shadow: 0 2px 7px #000000;
color: #FFFFFF;
font-size: 10px;
height: 30px;
margin: 0;
overflow: hidden;
padding: 0;
position: fixed;
right: 0;
top: 0;
width: 100%;
z-index: 100;
}
#tnsbar a {
color: #FFFFFF;
font-family: 'Droid Sans',sans-serif;
font-size: 12px;
font-weight: bold;
line-height: 30px;
list-style: none outside none;
text-decoration: none;
margin:50px;
}
</style>
<div id="tnsbar">
<div style="float:right;padding:4px;">
<a href='http://twitter.com/share' class='twitter-share-button' expr:data-url='data:post.url' expr:data-text='data:post.title' data-via='dadhust' data-lang='en'></a>
<b:if cond='data:post.isfirstpost'>f
</b:if>
</div>
<div style="float:right;padding:4px;">
<g:plusone size="medium"></g:plusone>
</div>
<div style="float:right;padding:4px;">
<fb:like layout="button_count" show_faces="false" font=""></fb:like>
</div>
<p><a href='#' target='_blank'>Your Text Here</a></p>
</div>

4. Now find this code </body> using CTRL+F and add the following codes above it, only if you haven’t added the Like, Tweet and Google+ button to your blog. If you already have them you don't need to follow this step.

<script src='http://connect.facebook.net/en_US/all.js#xfbml=1'/>
<script src='https://apis.google.com/js/plusone.js' type='text/javascript'/>
<script src='//platform.twitter.com/widgets.js' type='text/javascript'/>


Customize


      000000 is the background color of the sticky bar, you can change the color using this color code generator.  
      If you like to put it on the bottom screen, change top to bottom.  
      box-shadow: 0 2px 7px #000000 is that tiny box shadow on your bar, you can remove them by erasing it from the script. 
      Change dadhust to your twitter username.  
      Change Your Text Here to your desired message like "hello" or "welcome". In my case, I used that to make a floating menu bar. Here is a sample.
          Change this code from this
          <p><a href='#' target='_blank'>Your Text Here</a></p>
          </div>

          To this

          <p><a href='http://fromhobby2money.blogspot.com/' target='_blank'>~Home</a><a href='http://fromhobby2money.blogspot.com/p/contact-me.html' target='_blank'>~Contact</a><a href='http://fromhobby2money.blogspot.com/p/sitemap.html' target='_blank'>~Table of Contents</a></p></div>

          Those colored in red are the URL of your chosen menu, change them as you wish.


          That is all! I hoped you liked it, if you have questions kindly use the comment form below.

          Let visitors choose your blogger background color


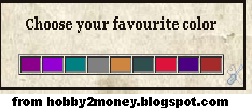
          background color for bloggerGood day everyone! today I will share to you a cool widget that could interact with your blog's visitors. I call it the "let your visitors choose their favorite color for your background widget for blogger" whew!

          Different people has different taste in colors, if a reader doesn't like the color of your site he might leave or close it. By using this type of widget it allows them to choose what color blends perfectly in their eyes while they are reading.

          Note: This widget will only work to those templates that has an outer background or something. In this blog the widget won't work because it has no background, my template is fully occupied.

          This is a sample of the widget, click DEMO

          Installation


          1. As usual my instructions are easy. Go to your blogger account > dashboard > layout > select add gadget > select HTML/ javascript.

          2. Copy and paste the code below

          <div class="widget-content">
          <center><b>Choose your favourite color</b></center>
          <br/>
          <script type="text/javascript">
          function bgChange(bg)
          {
          document.body.style.background=bg;
          }
          </script>
          <table border="1" width="100%" height="20">
          <tbody><tr>
          <td onclick="bgChange('#8B008B')" bgcolor="#8B008B">
          </td>
          <td onclick="bgChange('#9400D3')" bgcolor="#9400D3">
          </td>
          <td onclick="bgChange('#008080')" bgcolor="#008080">
          </td>
          <td onclick="bgChange('#808080')" bgcolor="#808080">
          </td>
          <td onclick="bgChange('#CD853F')" bgcolor="#CD853F">
          </td>
          <td onclick="bgChange('#2F4F4F')" bgcolor="#2F4F4F">
          </td>
          <td onclick="bgChange('#DC143C')" bgcolor="#DC143C">
          </td>
          <td onclick="bgChange('#4B0082')" bgcolor="#4B0082">
          </td>
          <td onclick="bgChange('#A52A2A')" bgcolor="#A52A2A">
          </td>
          </tr></tbody></table>
          </div>
          3. You can edit "Choose your favourite color " as you like.

          4. Save!

          Check out your blog and you will see bars with different colors, try clicking them it turns your blogs background color to anything you choose.

          If you like this trick kindly like our facebook fan page because I only have 4 so far :-(


          Adsense besides Add this sharing social widget below post title for blogger


          Adsense besides Add this sharing social widget below post title for bloggerAloha! today I will share to you some Adsense techniques that will help you earn more money. One of the best way to put your Adsense ads is putting it below post titles, but in this lesson we will add more, we add "add this" social sharing widget next to your Adsense ads. I found this trick on www.abctrick.net.

          Before we begin the installation, I need you to go to your Adsense account and create a new 300x250 blocks ads that will perfectly blend with your template. After creating your new ads, save and get code, then copy and paste the code on this HTML parser.

          Installation

          1. Log into your blogger account> dashboard> click edit HTML (make sure you back up your template in case you made some mistakes)> click on expand widgets.

          2. Now find this code ]]></b:skin> then copy and paste the below codes just above it. 

          /* Adsense below post title with Addthis and Social Badges by abctrick.net */ .boxround { margin : 0 auto; padding : 10px;border : 1px solid #ccc; -moz-border-radius-topright:10px; -moz-border-radius-bottomleft:10px; -webkit-border-top-right-radius:10px; -webkit-border-bottom-left-radius:10px; border-radius-topright:10px; border-radius-bottomleft:10px; } #addthis-left { float : left; } .addthis_toolbox .vertical { float : left; width : 215px; padding-left : 5px; min-height : 185px; position : relative; } .addthis_toolbox .vertical a { position : relative; display : block; width : 150px; padding : 4px 0 4px 34px; text-decoration : none; color : #626262; transition: color .2s ease-in-out; -moz-transition: color .2s ease-in-out; -webkit-transition: color .2s ease-in-out; -o-transition: color .2s ease-in-out; } .addthis_toolbox .vertical a:hover { color : #8f8f8f; text-decoration : none; border-radius: 4px; -moz-border-radius: 4px; -webkit-border-radius: 4px; } .addthis_toolbox .vertical1 { float : left; width : 215px; min-height : 185px; position : relative; } .addthis_toolbox .vertical1 a { position : relative; display : block; width : 150px; padding : 4px 0 4px 15px; text-decoration : none; color : #626262; transition: color .2s ease-in-out; -moz-transition: color .2s ease-in-out; -webkit-transition: color .2s ease-in-out; -o-transition: color .2s ease-in-out; } .addthis_toolbox .vertical1 a:hover { color : #8f8f8f; text-decoration : none; border-radius: 4px; -moz-border-radius: 4px; -webkit-border-radius: 4px; } .addthis_toolbox .vertical1 .more { border-top : 1px solid #eee; padding : 2px 0 0 0; margin : 10px 10px 0 10px; text-align : center; } .addthis_toolbox .vertical span { position : absolute; left : 14px; top : 4px; } .addthis_toolbox .vertical .more { border-top : 1px solid #eee; padding : 2px 0 0 0; margin : 10px 10px 0 10px; text-align : center; } .addthis_toolbox .vertical .more a { padding : 0 0; margin : 0; } .addthis_toolbox .vertical .more a:hover { background : none; } .addthis_toolbox .vertical .more span { display : none; } .googleplus { padding-left : 15px; padding-top : 5px; padding-bottom : 3px; display : inline-block;


          3.  Now, we will put jQuerry script as well as Google + and Twitter script on the template. Find the </head> tag and put the codes above it.

          <!-- Addthis jQuery - Remove if you already have this --> <script src='http://s7.addthis.com/js/250/addthis_widget.js' type='text/javascript'></script> <!-- Twitter Button jQuery - Remove if you already have this --> <script src='http://platform.twitter.com/widgets.js' type='text/javascript'></script> <!-- Google +1 Button jQuery - Remove if you already have this --> <script src='https://apis.google.com/js/plusone.js' type='text/javascript'>{lang: 'en'}</script>

          4. Find this tag <div class='post-header-line-1'/> or <data:post.body/> and paste the codes below above it.

          <!-- Adsense below post title with Addthis and Social Badges by abctrick.net Starts --> <b:if cond='data:blog.pageType == "item"'><!-- Remove --> <div class='boxround'> <table border='0' cellpadding='0' cellspacing='0' width='98%'> <tr> <td width='330'> REPLACE THIS LINE WITH CONVERTED ADSENSE CODE </td> <td><div class='boxround-right-min'> <div class='addthis_toolbox'> <div class='vertical'> <div class='googleplus'> <g:plusone annotation='bubble' size='medium'/> <iframe allowTransparency='true' expr:src='"http://www.facebook.com/plugins/like.php?href=" + data:post.url + "&amp;send=false&amp;layout=button_count&amp;show_faces=false&amp;width=90&amp;action=like&amp;font=arial&amp;colorscheme=light&amp;height=21"' frameborder='0' scrolling='no' style='border:none; overflow:hidden; width:90px; height:21px;'/> <br/> <a class='twitter-share-button' data-lang='en' href='https://twitter.com/share'>Tweet</a><br/> <a class='twitter-follow-button' data-lang='en' data-show-count='true' href='https://twitter.com/YOUR_TWITTER_USERNAME'>Follow @YOUR_TWITTER_USERNAME</a> </div> <a href='YOUR_GOOGLE_PLUS_URL' style='text-decoration:none; background-color:transparent!important; margin-left:-20px!important' target='_blank'><img alt='Adsense besides Add this sharing social widget below post title for blogger' src='https://ssl.gstatic.com/images/icons/gplus-16.png' style='border-right-width: 0px; border-top-width: 0px; border-bottom-width: 0px; vertical-align: middle; border-left-width: 0px;'/> Follow On Google+</a> <a class='addthis_button_facebook'>Share On Facebook</a> <a class='addthis_button_stumbleupon'>Stumble This Post</a> <a class='addthis_button_reddit'>Submit On Reddit</a> <a class='addthis_button_email'>Email To A Friend</a> <div class='more'> <a class='addthis_button_expanded'>More Destinations</a> </div> </div> </div> </div></td> </tr> </table> </div> </b:if> <!-- Remove --> <!-- Adsense below post title with Addthis and Social Badges by abctrick.net Ends -->
          Customize
          • *Replace "REPLACE THIS LINE WITH CONVERTED ADSENSE CODE" with your parsed Adsense code. Remember to parse it first before putting it there.
          • *Replace "YOUR_TWITTER_USERNAME" with your twitter username.
          • *Replace "YOUR_GOOGLE_PLUS_URL" with your complete Google + profile URL.

          SAVE TEMPLATE!

          Credits to www.abctrick.net

          Easy to Install Colorful Popular Post Widget for Blogspot


          If you are bored with your default popular post widget, then I have here an easy to install colorful popular post widget for blogger/ blogspot that currently I am using (you can see it on the right side). 

          This widget is converted from wordpress to blogger.

          Features for this widget are as shown in the image. It is also has an effect, when you point your mouse on your popular post.

          Instructions for these widget is very easy just follow these 4 simple steps.

          Installation

          1. Go to your Blogger.com account> click dashboard > go to layout > add gadget and choose popular post widget. Display up to 5 posts only.


          2. Then click on template Edit html > Proceed > look for this code  ]]></b:skin>
           using crtl+F.

          Note: Make sure you back up your template in case you made some mistakes putting the codes. Go to your blog dashboard, on the right side you will see a button backup/ restore and click on it, then click download full template.

          3. Copy and paste the code below above ]]></b:skin> . 


          .sidebar .PopularPosts .widget-content ul li{
          height: 100%;
          line-height: 22px;
          float: left;
          clear: left;
          list-style-type: none;
          overflow: hidden;
          color: gray;
          }
          .sidebar .PopularPosts .widget-content ul{margin:0;padding:5px 0;list-style-type:none;}
          .sidebar .PopularPosts .widget-content ul li{position:relative;margin:5px 0;border:0;padding:10px;opacity:0.8;
          -webkit-transition:all 0.4s;
          -moz-transition:all 0.4s;
          -ms-transition:all 0.4s;
          -o-transition:all 0.4s;}
          .sidebar .PopularPosts .widget-content ul li:hover {border-radius:30px 0px 0px 0px;margin-left:10px;opacity:1.0}
          .sidebar .PopularPosts .widget-content ul li:first-child {background:#ff4c54;width:90%}
          .sidebar .PopularPosts .widget-content ul li:first-child:after{content:"1"}
          .sidebar .PopularPosts .widget-content ul li:first-child + li{background:#ff764c;width:80%}
          .sidebar .PopularPosts .widget-content ul li:first-child + li:after{content:"2"}
          .sidebar .PopularPosts .widget-content ul li:first-child + li + li{background:#ffde4c;width:70%}
          .sidebar .PopularPosts .widget-content ul li:first-child + li + li:after{content:"3"}
          .sidebar .PopularPosts .widget-content ul li:first-child + li + li + li{background:#c7f25f;width:60%}
          .sidebar .PopularPosts .widget-content ul li:first-child + li + li + li:after{content:"4"}
          .sidebar .PopularPosts .widget-content ul li:first-child + li + li + li + li{background:#33c9f7;width:40%;padding-right:20px;}
          .sidebar .PopularPosts .widget-content ul li:first-child + li + li + li + li:after{content:"5"}
          .sidebar .PopularPosts .widget-content ul li:first-child + li + li + li + li +li{background:#7ee3c7;width:30%}
          .sidebar .PopularPosts .widget-content ul li:first-child + li + li + li + li + li:after{content:"6"}
          .sidebar .PopularPosts .widget-content ul li:first-child + li + li + li + li + li +li{background:#f6993d;width:20%}
          .sidebar .PopularPosts .widget-content ul li:first-child + li + li + li + li + li + li:after{content:"7"}
          .sidebar .PopularPosts .widget-content ul li:first-child:after,
          .sidebar .PopularPosts .widget-content ul li:first-child + li:after,
          .sidebar .PopularPosts .widget-content ul li:first-child + li + li:after,
          .sidebar .PopularPosts .widget-content ul li:first-child + li + li + li:after,
          .sidebar .PopularPosts .widget-content ul li:first-child + li + li + li + li:after,
          .sidebar .PopularPosts .widget-content ul li:first-child + li + li + li + li + li:after,
          .sidebar .PopularPosts .widget-content ul li:first-child + li + li + li + li + li + li:after{position:absolute;top:15px;right:-5px;border-radius:9%;background:#353535;width:30px;height:40px;line-height:1em;text-align:center;font-size:22px;color:#fff;}
          .sidebar .PopularPosts .widget-content ul li .item-thumbnail{float:left;border:0;margin-right:10px;background:transparent;padding:0;width:30px;height:90px}
          .sidebar .PopularPosts .widget-content ul li a{font-size:12px;font-weight:bold;color:white;text-decoration:none;text-shadow:0px 0px 6px white;
          -webkit-transition:all 0.4s;
          -moz-transition:all 0.4s;
          -ms-transition:all 0.4s;
          -o-transition:all 0.4s;
          }
          .sidebar .PopularPosts .widget-content ul li a:hover{color:black;text-decoration:none;text-shadow:1px 1px 1px white;}

          4. Save template and you are done!


          That's it hope you like it!

          Cheers!


          Search This Blog

          Visitors